Guide with all the necessary steps so that you can change the flex with the audio output connector and proximity sensor of the Sony Xperia Z3 Compact.


Before starting, make sure the mobile is off.


Remove the SIM and SD cards.


Like the rest of the Xperia Z range, the back cover is glued with an adhesive that guarantees the tightness of the equipment.
We will apply heat to the back cover to soften the glue and to peel off easily.
We suggest 2 methods:


Heat the Hot Glass in the microwave for a couple of minutes (see instructions) and apply heat for a couple of minutes directly to the back cover.
If you use the hot air nozzle, a few seconds will suffice.


Insert the tip of a tine behind the back cover and go around the entire contour, releasing the thin adhesive strip.
Use a suction cup to gently pull the lid.


Remove the 5 Phillips screws that hold the middle housing.
Disassemble the casing, loosening the plastic hooks located around the contour.


Peel off the NFC antenna connector to separate the middle housing.


Disconnect the battery from the motherboard.


Peel off the battery from the motherboard, prying gently with the double opening tool.


Remove the Phillips screw that holds the motherboard.
Remove the metal support that covers the camera connector.


Unplug and detach the rear camera.


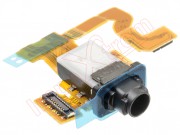
Unplug the audio output flex and the LCD data flex on the motherboard.


Separate the base plate, prying gently and releasing the hooks located around the contour.


To remove the audio connector, we must take off the seal that allows the terminal to seal. Push it back until you get it off.