Guides with all the necessary steps for you to repair the Oppo A3 (CPH2185) yourself.


First we apply heat to the back of the terminal and with a fine tool we are taking off the battery cover all around until we are able to separate them


We extract the nineteen Phillips type screws (PH # 00) that hold the intermediate casing, then we extract the sim tray to be able to remove the casing from its housing.


With a fine tool we extract the camera lens


Next, we are releasing the casing around its entire contour with the help of a plastic tool and we remove it


With a fine tool we loosen the connection of the battery housed in the motherboard to avoid incidents.


We release all the connections housed in the motherboard with the help of a fine plastic tool and remove the motherboard


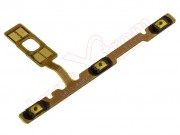
Next, we remove the flex from the side pushbuttons, carefully detaching them from their base with a fine tool.