Guide with all the steps necessary for you to change the components of the OnePlus 7T Pro (HD1913) yourself.


First of all we must apply heat to the back shell to soften the adhesive that holds it, and with the help of a fine tool we will open a small hole through which we will introduce a plastic tool, with which it will be less likely to damage the shell.


We remove the fourteen Phillips screws (PH # 00) that hold the intermediate casing, and with the help of a flat tool we will unhook it.


We disconnect the battery to work with greater security.


We disconnect the components that are connected on the motherboard.


With the help of tweezers we will disconnect the coaxial cables that are connected on the board.


We remove the two Phillips screws (PH # 00) that hold the plate, disconnect the front camera, and we can now remove the plate.


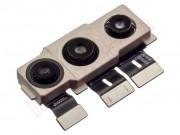
And to finish we can already remove the rear cameras that we are going to replace.