Szenio 5000 - Motherboard

Guide with all the necessary steps for you to change the motherboard of the Szenio 5000 Tablet PC yourself.
Difficulty
1
2
3
4
5

Tutorial: Step by step

Step 1 Tablet PC Senegal 5000

Specifications :

Processor : RK 3188-T Cortex A9 Quadcore 1.4 Ghz
RAM memory: 2GB
Operating system: Google Android 4.4
Internal memory: 32GB
Display: TFT touch capacitive multicontact 10.1 "(16: 9 format) (1024 × 600 pixels)
Cameras: front of 0.3 Mp and rear of 2Mp
Battery: Rechargeable Lithium polymer (5000 mAh)
Inputs / Outputs:
USB 2.0 / USB 2.0 OTG
HDMI
Audio jack
Micro SD / SDHC card reader (max 32GB)
Connectivity:
Wifi 802.11 b / g / n, 2.4 Ghz GSM
Bluetooth
Dimensions : 260mm x 149mm x 9.8mm
Weight : 510 gr

Before you start, make sure the tablet is off.

Step 2 SD card

Remove the SD card.

Step 3 Back case

Remove the 2 Phillips screws that secure the back cover.

Step 4

To separate the back cover, we must release the plastic hooks around the contour. We recommend the opening tool type "cortapizzas" to disassemble without scratches.

Step 5

The speakers are glued to the back cover. Carefully separate that side by detaching the speakers.

Step 6 Adhesives

Remove the adhesives that cover the connections and connectors of the motherboard.

Step 7 Desoldering components

Unsolder the coaxial antenna cable and the battery terminals.

For this, we apply heat with the tip of the soldering iron to the tin while, simultaneously, we gently pull the respective wires.

Step 8

Unsolder the speaker cables.

You must re-solder the components when installing the new motherboard.

Step 9

Remove the microphone from the plastic holder and unsheathe the cables on the motherboard.

Step 10

Disconnect display flexes and cameras. To do this, press the tabs on the connectors and pull the respective flexes gently.

Step 11

Disconnect the data flex from the touch screen.

Step 12 Motherboard

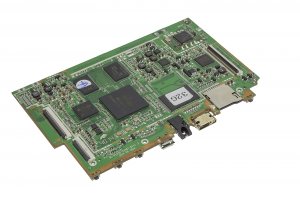
Finally, we extract the base plate, held by 3 Phillips screws.

Video Tutorial summary

In this video you can watch a quick summary of the tutorial, but we recommend to follow the complete tutorial, with its explanations and detailed images.
Share this tutorial