Guide with all the steps necessary for you to change the Woxter Zielo S11 motherboard yourself


To remove the back cover we will use a plastic tool, this way we will avoid damage to the phone.


We can use the same tool to help us remove the battery.


We will remove the SIM and micro SD cards by pulling them. If necessary we can use tweezers or another tool.


It may seem angry, but deep down our monster ... he likes us to take pictures! While holding the phone, we show you where the screws are.
In the second photo we can see that a sticker covers one of the screws. That does not happen to you!
In any case, we still can not remove the inner shell. There is another hidden screw that will force us to remove the lower cover.


To remove the lower cover we will remove the screws from the bottom of the mobile. This will reveal the last screw of the inner casing.


We will use a fine tool. Carefully we will pry into the notches that hold the housing.


The motherboard can not be removed completely without desoldering the volume buttons. We will avoid desoldering them whenever possible.
We will disconnect the flex from the touch screen of the plate, previously lifting the fastening tab.
We will also remove the adhesive that covers one of the screws on the plate.


Now we just have to disengage the power button and remove the chassis vibrator to lift the plate, but not quite. Before lifting it, we recommend to see the next step.


In this step we show you two connectors. One we show how to disconnect it easily. The other, the one below in the image, in case it does not disconnect only when lifting the plate, we can disconnect it before any other connector. Although with the plate put in its place can hardly be seen, you can access it with some tool.


As we showed in the first photo, the volume button flex is still connected. From here we must proceed with care when we move the phone to avoid breaking this flex.
We will desoldaremos the toner to be leaving the plate the cleanest of components that we can.


In this step we desoldamos the power button and the volume buttons.


We disconnect the remaining components, in this case the two cameras.


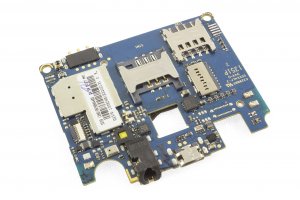
Here we show you the motherboard.


