Guide with all the steps necessary for you to change the Ulefone Power 5 components yourself.


First of all, we will remove the tray from the cards.


We extract the six Torx screws (T4) that hold the side frames, the four screws also Torx (T4) that hold the rear case, and the two Pentalobe screws (TS1) on the bottom of the phone.


Once the side frames have been disassembled, we will have to continue removing more screws, now we will have to remove eight Phillips screws (PH # 00) and we will be able to unhook the back cover.


We extract the five Phillips screws (PH # 00), we take off the rear angle camera, and we can unhook the upper case.


We disconnected the battery for safety.


We disconnected the rear camera and removed it.


We extract the two Phillips screws (PH # 00) that hold the bracket and disconnect the angular camera.


Take off the sticker that is on top of the battery so, pulling the adhesive that surrounds the battery, we will be able to take off the battery more comfortably.


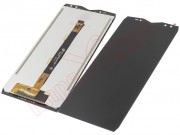
We disconnect the flex from the screen, apply heat, and with the help of one or more plastic tines, we will remove all the edges of the damaged screen.