Guide with all the necessary steps so that you can change the components of the Nokia 6 yourself.


We start by heating the screen to soften the adhesive. For this we will heat it at about 70º for about 2 minutes.
With the hot screen, we introduce an opening tool between it and the frame and, sliding it around the contour, we will be able to detach it.
We will take care in the lower part so as not to damage the flex of the screen.


We remove the Phillips screw (PH # 00) that holds the shield of the screen connector and disconnect it.


We remove the shield of the connector of the front buttons and disconnect the flex from the battery. Now, we remove the seventeen Phillips screws (PH # 00) that hold the casing and disengage it.


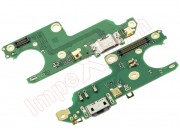
Remove the four Phillips screws (PH # 00) that hold the plate and disconnect the coaxial cable. Now we disengage the plate to disconnect the interconnection flex which is screwed to it.