BQ Aquaris E5 - Front camera

Guide with all the necessary steps for you to change the Bq Aquaris E5 front camera yourself.

Difficulty
1
2
3
4
5

Tutorial: Step by step

Step 1 Bq Aquaris E5

Specifications
Dimensions: 5 "
Technology: Capacitive IPS screen 5 simultaneous detection points. Dragontrail protective glass
Resolution: HD 720x1280 - 294 ppi (HDPI)
Aspect ratio: 16: 9
Viewing angle: 178º
Dimensions and weight
Dimensions: 142 x 71 x 8.65 mm
Weight: 134 g
Processor
CPU: Quad Core Cortex A7 up to 1.3 GHz MediaTek
GPU: Mali 400-MP2 up to 500 MHz
Memory
Internal memory: 16GB
RAM: 1 GB
Battery: LiPo 2500 mAh
Connections
Dual micro-SIM
OTG micro-USB slot
Jack 3,5 mm for headphones
MicroSD ™ slot up to 32 GB
Connectivity
Wi-Fi 802.11 b / g / n
Bluetooth ™ 4.0
2G GSM (850/900/1800/1900)
3G HSPA + (900/2100)
GPS and A-GPS
Interface
Operating system: Android 4.4
Camera
Rear:
13Mpx - Interpolated 18Mpx (Dual flash and autofocus)
Opening of ƒ / 2,2
Focus range 0.1 m ~ infinity
Number of lenses 5P
Lens size 1 / 3.2 "
Resolution of the video Full HD (1080p) Full HD (1080p)
Frontal:
5Mpx - interpolated 8Mpx
Opening of ƒ / 2,4
Video recording
Rear EIS1080p 30fps
Frontal VGA (640X480) 30fps
Sensors
Brightness sensor, proximity sensor, accelerometer, eCompass, gyroscope

Step 2 Sim and microSD cards

To remove the microSD card we just have to lift the lid and press the card.

To remove the SIM cards we will introduce a fine tip tool to remove the trays.

Step 3

We remove the back cover using a plastic tool to avoid damage. By levering, we will disengage the casing.

Step 4 Intermediate housing

To remove the case remove the 4 screws without passing the hidden one. We also remove the metal sheet and its respective screws.

Step 5

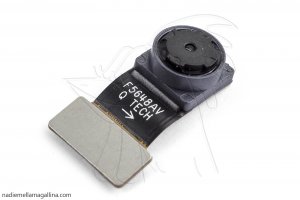
We disconnect the flex from the touch screen, the front camera and take off the vibrator.

Step 6 Front camera

We remove the motherboard and we can access the camera and take it off.

Video Tutorial summary

In this video you can watch a quick summary of the tutorial, but we recommend to follow the complete tutorial, with its explanations and detailed images.
Share this tutorial